
Unlocking the secret to achieving the perfect ab workouts for shaping a toned midsection involves a careful mix of essential elements. Start by incorporating functional movements that engage your entire core and improve stability, laying the foundation for effective sculpting. Inject some creativity by adding a fresh twist to traditional ab exercises such as sit-ups and crunches, making your routine more exciting and maximizing muscle activation....For More CONTINUE THE FULL READING▶▶
Build a strong core with the help of planks, ensuring your abs are resilient. Furthermore, include rotational and anti-rotational exercises in your workout to target all the muscles in your core for a complete toning and definition experience. By following this effective strategy, you will craft an attention-grabbing and confident midsection.
Discover my favorite ab workouts for achieving a lean midsection below. These exercises will bring you closer to that sought-after washboard stomach just in time for summer! Stay focused during each repetition, giving it your all. When bodyweight exercises start feeling repetitive, challenge yourself by adding weights. Above all, remember to enjoy the process.
Continue reading to find out about the five top ab workouts for a lean midsection. Once you’re done, make sure you don’t miss out on these 10 exceptional low-impact exercises to help you burn belly fat.
Workout #1: Dead Bugs
These ab workouts for a lean midsection kick off with dead bug variations. Dead bugs are a go-to option for anyone aiming to enhance core strength and stability while striving for those sought-after aesthetics. This exercise engages the core and targets the hip flexors, providing a functional workout for the entire midsection. As you perform each rep, focus on controlled movements to maximize the benefits of this effective core exercise.
1. Alternating Dead Bugs
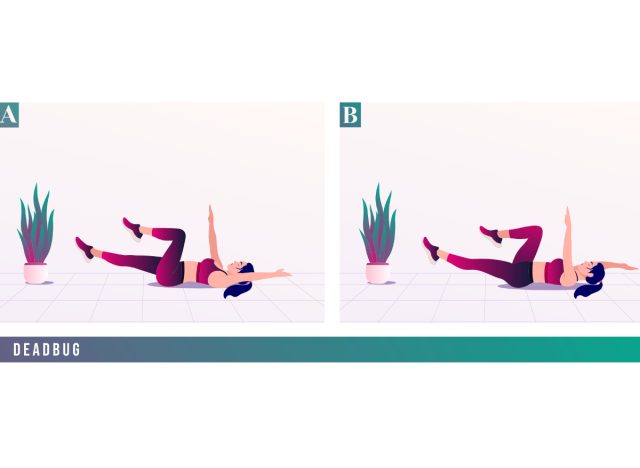
To execute alternating dead bugs, lie on your back with your arms extended toward the ceiling and your legs bent at a 90-degree angle. Lower your right arm and left leg simultaneously toward the floor, keeping your lower back pressed against the ground. Alternate sides, maintaining control and engaging your core throughout. Perform three sets of eight to 12 reps per side with 60 seconds of rest between sets.
2. Dead Bug Pullovers
Hold a kettlebell by the horns, and press it over your chest as you assume the dead bug position. Inhale deeply, exhale as you extend one leg, and slowly lower the kettlebell behind you, maintaining a slight bend in your elbows and alternating legs. Complete three sets of six to 12 reps with 60 seconds of rest between sets.
3. Dead Bug Crunches
Begin in the standard dead bug position, ensuring your back is firmly pressed against the floor and your knees are bent at a 90-degree angle. Hold a dumbbell above your chest with straight arms. Execute a controlled crunch, reaching the dumbbell toward the ceiling. Maintain control during the descent, ensuring your shoulders only touch the ground once you have completed all repetitions. Perform three sets of 10 to 15 reps with 60 seconds of rest between sets. Perform the last set as a set to near failure.
Workout #2: Sit-ups
Don’t get sit-ups confused with crunches. The distinct difference is that sit-ups fully engage your rectus abdominis, recruiting the upper, mid, and lower abs. Creativity and control are the keys to this ab-carving formula. Control your lowerings, squeeze your abs, and I’m confident you’ll feel (and see) the work you’ve been putting in!
1. Straight Leg Sit-ups
Performing straight-leg sit-ups involves lying on your back with your legs straight and holding a dumbbell, kettlebell, med ball, or weight plate above your forehead, arms straight. Engage your core as you lift your upper body toward your toes and reach the dumbbell toward the ceiling. Keep your legs straight, and lower your upper body with control while inhaling. Complete three sets of 10 to 20 reps or 30 to 45 seconds with 60 seconds of rest between sets.
2. TGU Sit-ups
Begin by lying face up on the floor, holding a kettlebell or dumbbell in your right hand. Bend your right knee, and place your right foot on the floor. Extend your left leg at a 45-degree angle and simultaneously extend your left arm, palm on the ground. Press your right arm and the kettlebell above your chest. Using your left arm for assistance, sit up, reaching the kettlebell toward the ceiling. Lower your body to the floor with control, focusing on the slow descent through your abs and lower back. Perform three sets of five to eight reps per side with 90 seconds of rest between sets.
Workout #3: Side Planks
Side planks are excellent for sculpting and strengthening your core’s lateral muscles, honing in on your obliques and hips for a well-rounded workout. By incorporating static holds, you can boost strength, while adding dynamic movements like hip dips or leg lifts can amplify the hypertrophy effect, further enhancing hip strength and definition.
1. Side Plank Holds
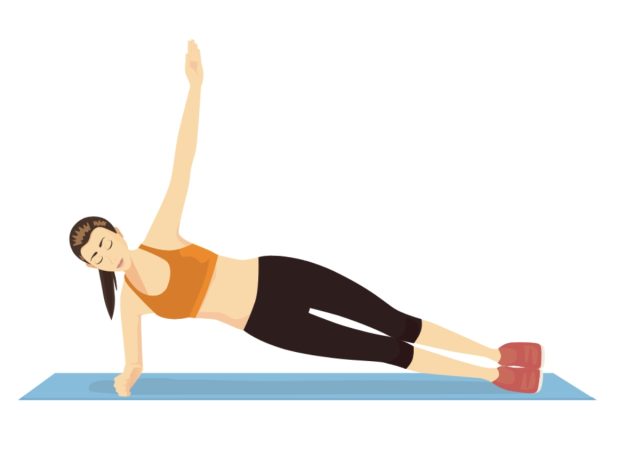
To perform side plank holds, lie on your side with your legs straight, feet stacked, and elbow under your shoulder. If you prefer, hold a weight against your top hip, or use your body weight. Lift your hips, form a straight line, and engage your core. Then, lower your hips and repeat on each side for desired reps or time. Complete three rounds of 30 to 45-second holds with 60 seconds of rest.
2. Side Planks with Hip Dips
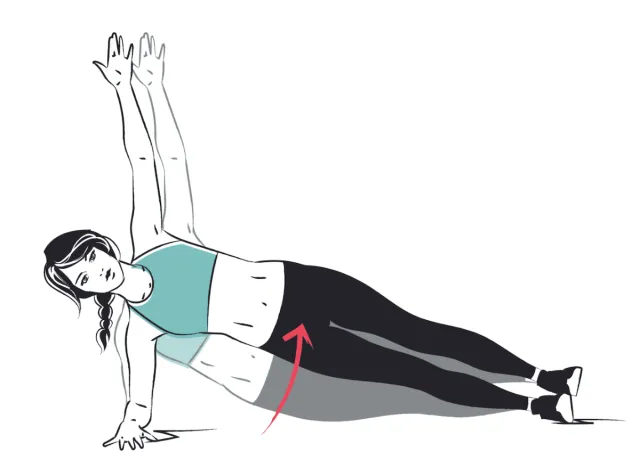
Lie on your side with your bottom elbow beneath your shoulder and your feet stacked. Lift your hips off the ground, creating a straight line from head to feet. Next, lower your hips without touching the ground, and return to the plank position. Repeat for a set number of reps on one side, switch to the other, and repeat. Focus on stability, exhale during the dip, and inhale when returning. Perform three sets of 15 to 20 reps per side with 60 seconds of rest between sets.
2. Side Planks with Leg Lifts
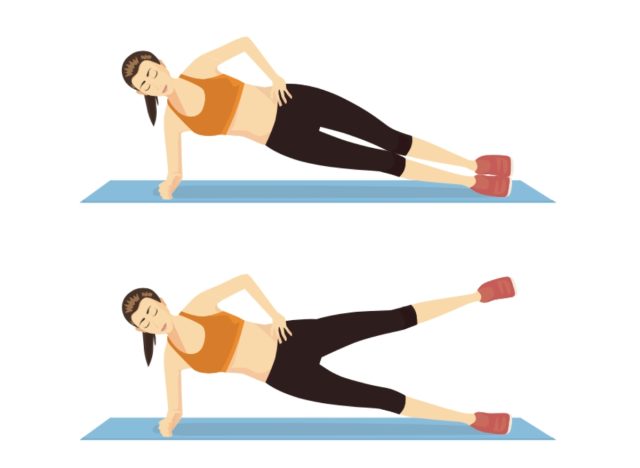
Start in a side plank position with your elbow under your shoulder, lifting your hips to form a straight line. Lift your top leg straight up, engaging your hip muscles, and hold briefly before lowering it. Switch sides, and repeat. Complete three sets of 15 to 20 reps per side with 60 seconds of rest between sets.
Workout #4: Crunches
Crunches are like precision tools for sculpting your core—especially targeting those upper abs and defining that coveted six-pack look in your rectus abdominis. Experiment with some of these variations to take your ab game to the next level. Remember to prioritize core engagement, and focus on controlling the downward phase to maximize each rep’s effectiveness.
1. Weighted Crunches
Lie on your back with your knees bent and your feet flat on the floor. Hold a weight plate, dumbbell, or medicine ball against your chest or behind your head. Engage your core, lift your shoulders off the ground, bring your ribcage toward your hips, then lower back down. Perform three sets of eight to 15 reps with a three-second lowering, taking a 60-second rest between sets.
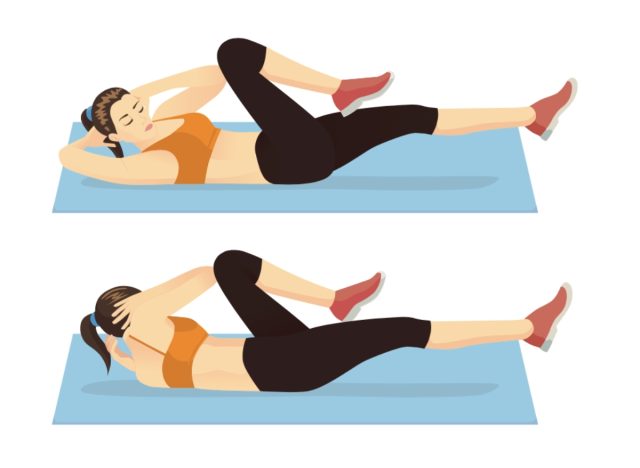
2. Reverse Crunches
Reverse crunches begin by having you lie on your back with arms at your sides and your legs in a tabletop position. Place your hips at a 90-degree angle with your shins parallel to the ceiling. Lift your hips off the floor, squeeze your abs, and slowly lower your heels toward the floor using a three to five-second slow lowering. Once the heels tap the ground, return to the starting position. Complete three sets of five to eight reps. Slowly lower yourself by three to five seconds per rep.
3. Bicycle Crunches
Lie on your back with your hands behind your head, legs lifted off the ground, and your knees bent. Bring your right elbow and left knee together while straightening your right leg, then alternate by bringing your left elbow and right knee together while straightening your left leg. Perform three rounds of 30 to 45 seconds with 60 seconds of rest between sets.
Workout #5: Cable Pallof Press
These ab workouts for a lean midsection wrap up with the Pallof press. Pallof presses are my must-have anti-rotation movement in almost any workout. Anti-rotation exercises are potent for engaging the major muscles of your core while providing functional benefits. Not to mention, these movements help you feel your abs firing up! Dose these effectively to carve out that midsection.
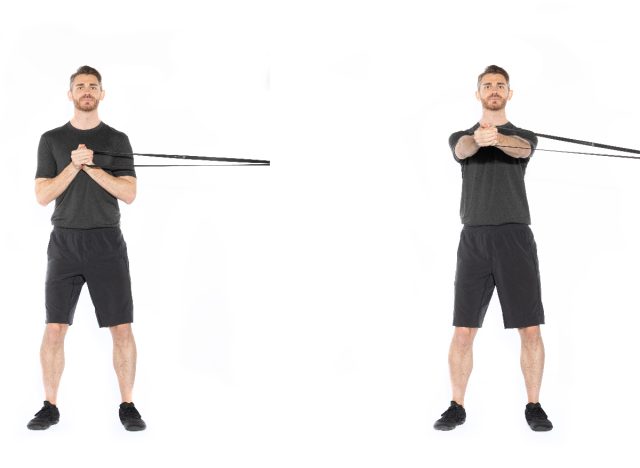
1. Pallof Press
Position yourself parallel to the cable machine or resistance band anchor point, standing with your feet shoulder-width apart and gripping the handle or band with both hands. Keep your torso facing forward and tall as you bring your hands to your sternum. Press out slowly, maintaining a stacked torso throughout the movement. Focus on a strong exhale as you press out and a deep inhale as you bring the cable or band back in. Complete three sets of eight to 15 reps with a two-second hold per press. Rest for 60 seconds between sets.
2. Pallof Holds
Position yourself parallel to the cable machine or resistance band anchor point, standing with your feet shoulder-width apart and gripping the handle or band with both hands. Keep your torso facing forward and tall as you bring your hands to your sternum. Press out slowly, maintaining a stacked torso throughout the movement. Focus on strong breath cycles and squeezing your abs for the duration of the hold. Perform three sets of 20 to 30-second holds per side. Rest for 60 seconds between sets.
3. Pallof Press + Rotation
Position yourself parallel to the cable machine or resistance band anchor point, standing with your feet shoulder-width apart and gripping the handle or band with both hands. Keep your torso facing forward and tall as you bring your hands to your sternum. Press out slowly, maintaining a stacked torso throughout the movement. Using your core, rotate away from the anchor point, ensuring your spine stays elongated. Bring the band or cable back to the center position. Complete three sets of eight to 15 reps. Rest for 60 seconds between sets.


